Sunday, June 3, 2012

~skirt turned dress tutorial~

 Remember this skirt:

...that I turned into this:

For any of you interested in doing this
EASY transformation, here's how I did it.

Let me just tell you before we get started...
my pictures suck! There's just no way around
that at this point so I just had to make due
with the pictures I had. I hope between the 
pictures and the written instruction, you
will be able to follow. 

First off-start with a long skirt. I got
this skirt at a local thrift store for $5. 
It can be any material but I recommend a cotton
or polyester blend....these will be easiest to hem.
IT HAS TO HAVE AN ELASTIC WAISTBAND!

Next-put the bra on that you intend to wear
with the dress once it's complete....this is important
because you want to make sure and place the
straps of the dress so they cover your bra straps.

Put the skirt on and pull it clear up over your boobs
in order to determine how long you want it and
how much you'll need to take off the bottom. 
Place a pin where you want the length to be.
Take the skirt off now and let's begin!

You've marked with the pin where you want 
the length of the skirt to end up so we need
to add a bit for a hem allowance. From the
point of the pin, add an inch towards the bottom
of the dress (this is our hem allowance) and mark
with your marking pen or chalk. 

Now, you will need
to measure the distance of the bottom of the original
hem to the mark you just made.....mine was 3".
Now go around the entire skirt, making a 
mark every couple inches to determine where you
will need to cut. Be sure to measure from the bottom of
the original hem in order to ensure a straight
hem on your new length.  

Once you have marked around the entire skirt,
you are ready to cut. You will basically just
connect the marks you just made while cutting
with your scissors or blade.

 Be sure to lay your skirt out so that you
are only cutting thru ONE LAYER!
Also-you need to cut this off in one continuous piece.
This fabric we just cut off will be used for our straps.
Once you have completed cutting the bottom of the skirt
off, put that piece to the side...we'll come back
to it in a minute.

Let's go ahead now and put a new hem on the 
bottom of the skirt. I turned mine over 1/2" TWICE
so I had a finished edge. Mark it with your 
seam gauge, pin and iron as you are marking it.
Now go ahead and sew it.
Next we are going to make our straps.

Take the big piece you just cut off from the
bottom of the skirt. Determine how wide you
want your straps to be. If the piece you cut off is
extremely wide you'll need to cut some of it
off again so it's not too bulky. I simply
folded the unfinished edge over to meet the 
center of the already finished edge and that was
perfect (My straps are 1.75" wide).
 Go ahead and iron it down.
 
 If you have a serger I would recommend serging
the raw edge before you fold it over and iron it
down. However, I don't have a serger so I didn't
finish the edge first.....I figure it won't show and
I didn't want to take the time to finish the edge.
Hopefully it won't fray too bad when I wash it.

Now you can sew the piece down.
I went ahead and made two stitch lines down
the length of the strap in the center because I thought it
looked better that way. Depending on the type of 
stitch that was in the original hem, you may already
have a visible stitch. If this is the case-be sure to
sew this down using the existing stitch as a 
guide to determine the distance apart for the 2nd
stitch you are about to put in. Does that make sense?
You want the stitches to be straight because
they will be very visible on the straps.

 Now you should have a big long piece of fabric with 
finished edges. Go ahead and cut it in half.
 This next part is MUCH EASIER if you have someone
who can help you. I didn't and it took me forever!
You need to determine the placement of the straps now
so put the dress on, pulled up over your boobs. 
Remember to have the bra on that you intend to 
wear with the dress. Have someone pin the straps
onto your dress both in the front and the back.
 You are going to sew this right onto the dress
now but you don't want to sew thru the elastic.
You still want the elastic to be able to stretch and move
so be careful to pin and sew at the top and bottom
of the casing NOT thru the elastic.

 Sew both straps on.
Almost done.....now we want to sew the sash onto
the front of the dress. This is what makes the 
sweetheart-type neckline and fitted bust look.

The skirt I bought already had a very long sash attached 
to it so I just used that. If you need to make one,
You can either use a scarf you already have
or you will need to sew another long strap that
is approximately 3.5 " wide and 6 ft long.
Most likely you won't have enough fabric from the 
bottom of the skirt to make a sash with also.
That's OK. I actually think it would have
been cuter if I had used a different fabric for the sash.
(in fact-I'm going to try that next time)

If you have to make a sash from scratch-you will need a 
piece of fabric that is 8" wide by 6 ft 1 inch long.
Fold it in half lengthwise, right sides together
and stitch it together using a 1/2" seam allowance.
Do not sew the two ends.
Now you turn it right side out by pulling
one end thru to the other end. Iron it
and after turning your ends under, 
sew the ends shut.
Now you have your sash.

Fold your sash in half lengthwise and pin the
center of it to the center of the bust of your dress,
right directly underneath the bottom stitch
from the elastic casing. 
Stitch this onto the dress,
being sure again to not stitch thru the elastic.
You don't need a long stitch line for this because
you want it to be sewn onto it with just
a SMALL stitch length. 
Mine is only like 3 stitches that I just
re-enforced several times using my back stitch.

THAT'S IT!
You're done.

Put the dress on and pull the sash down underneath
your boobs and pull tight around to the back.
Tie and adjust as you need to.
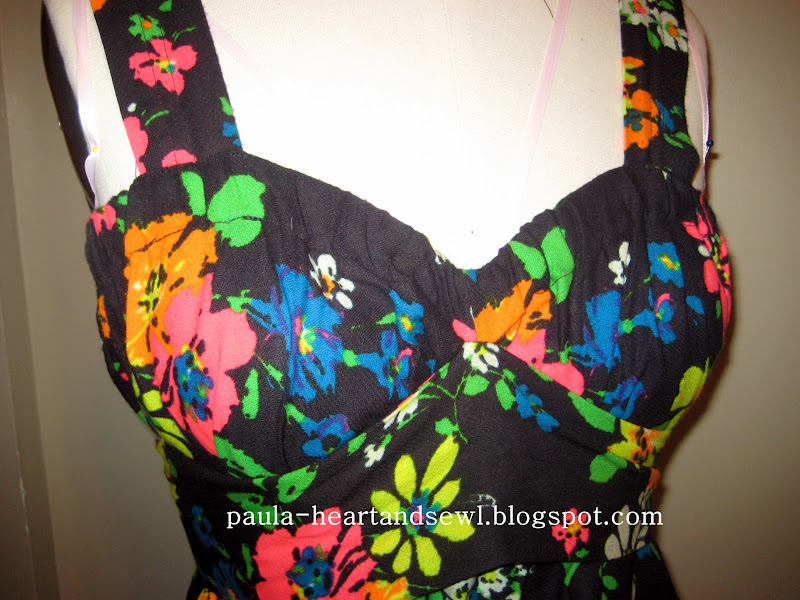
 Voila....
a new sundress made from a skirt.
Guess what?
You just made a dress that can be worn 3 ways.
If you want more coverage in the front you
can turn it around and wear it like this:
This offers more coverage in the boobie/cleavage
department....the tie is in the front now. 

I don't have pictures of this but you can also
wear it as a maxi skirt with a sash tied at the waist.
I've worn it all 3 ways and trust me.....
it's equally as cute each way!

Again, I apologize for the crappy pics in this 
tutorial......the tutorial took me longer to
create than the entire dress did!

 Linking up with Positively Splendid.
and


Pin It

Monday, May 28, 2012

~poor girls flower arrangement~

 The flowers on my table last week:
Recognize the tall vase?
Maybe the water marks at the top will give
you a clue.....it was our former
gold fish high rise (click here for a reminder).
As I'm sure you've guessed by now-the goldfish died.
The water marks at the top of my gigantic vase
will always be a reminder of the one and only
pet I ever allowed the kids to have.
 Mint, chives and the white puff ball again.
This will be the last of the puff balls this year.
Which is a shame because I love them.
I used this old bottle and apothecary jar to display
the simple little flowers and greens. 
This has actually been my favorite centerpiece
yet this year. I love the color combo along with 
the glass and visible water. 


 I wish you could smell the mint thru
your computer. It is simply DIVINE.
Not sure yet what I'll do for this week. 
We are in between blooms right now.
Iris are shriveling and the roses aren't ready to be cut.
I'll have to get creative. 
Ooh......I love a challenge. 
Pin It

Friday, May 25, 2012

~buggin~

I'm bugged.
I was going to post the tutorial for the skirt I 
made into a dress BUT..... 
I just looked at the pics I took as I was making
the dress.....the pics are horrible!
Not surprising since I had an hour to make it
before I had to leave for the place I wanted to wear it!
I'm not going to be able to put the tutorial of
the dress up yet. Sorry...it's gonna take some
picture doctoring and new pics.  I'll get to it
first thing next week. 

So....enjoy the pics of the bugs in my yard.


Pin It

Wednesday, May 23, 2012

~skirt into dress~

 Remember this thing I showed you a couple days ago?
Not the most attractive like this but I had a vision for it
the moment I saw it.
 I've been seeing a lot of neon colors
this season and wanted to add some of it into my 
wardrobe without spending a lot of money. 
I feel pretty confident in saying that I think neon
will be a micro-trend; lasting only this summer.
Taking that into account, the asking price of $5
at my local thrift store made it a PERFECT option
for spicing up my wardrobe. 
It's definitely a vintage piece....I'm pretty sure
straight from the 70's. 

Check out the final reformation! 

I LOVE it!
It's one of my favorite summer pieces
at this point. I think it's going to see a lot wear 
this summer. I was hoping to have the tutorial
done by now but it's not. I'm shooting for later today.
It was super easy and I did it in less than an hour!
Seriously......a beginner can do this!


Pin It

Monday, May 21, 2012

~simple flower arrangement~

 To me, nothing says "life" like flowers do.
I love to have fresh flowers in my house and
am lucky enough to get them for FREE all summer.
My husband is a wonderful gardener and he 
lovingly picks and arranges bouquets for me
all summer long. He may be losing his title this 
summer as "arranger" because I am really starting 
to enjoy it myself. Each week I have been 
picking and arranging flowers to bring into my house. 
Here's what I did last week:
 
A simple three part arrangement for my kitchen table.
Lavender, green and white.
Iris, chives, mint and white puff balls (??? that's what we call it).
Simple beauty.
I smiled each time I looked at it. 


 I challenge you this week to recognize the 
BEAUTY in the simple things....
it doesn't have to be big to be magnificent!
Pin It

Saturday, May 19, 2012

~closet peek-a-boo~

 I haven't done "A peak inside my closet" for a 
couple weeks. The reason being; I haven't really
worn much worth photographing. Since I started
posting about what I wear on a daily basis I've 
learned a couple things about my wardrobe:
1) I wear a lot of black
AND
2) A lot of the stuff I wear isn't that great

Let me tell you....it's been a real kick in the butt 
to step it up with my wardrobe. 

Here's a few outfits I've worn the past couple weeks.
I wore this to a barbecue. This outfit is another one
of those examples of "buy nice stuff and it will last you forever".
I've had the skirt, the boots and the belt for several years.
The belt is AMAZING! I bought it at a vintage store
years and years ago.....long before the cheap imitations
of belts like this were popular. The buckle is sterling silver,
the leather is genuine and is is completely handmade. 
I think I paid $30 for it. The boots get cooler looking the more 
worn they become and the skirt is a staple piece of my
summer wardrobe. I also wear it belted as a dress.
 This outfit I wore to a sushi dinner for a friend's birthday.
I originally got the outfit for my Vegas trip in February.
I love the contrast of the lace with the tailored vest.
BUT....the best thing about this outfit-THE SHOES!
They make me soooo much taller.
I'm only 5'2 so they really give me a boost. 
Believe it or not, they are pretty comfortable.

This outfit I wore to my son's pre-school graduation.
It's basically a $20 outfit. The bracelet was more expensive
than everything else combined. Again....pieces I've 
had for a really long time. This beaded shrug
is an "occasion" piece that I feel so feminine and
pretty in each time I wear. It was only $5!

I've really been trying to bring some color into my
wardrobe since realizing my obsession with black clothes.

Wait and see what I did with this skirt:
 It may very well be my favorite summer 2012 piece!
I'll show you next week. 

To answer your question Jolie about why I don't 
photograph the clothes on me....there's a few
different reasons. 

A) it's quicker and easier for me to lay them out 
than to try and take the time to get a good
shot of me in them. I never remember to do it when I'm 
wearing them. I've tried setting my timer and using my
tri-pod but haven't been able to find a good spot
in my house to do that. I've also tried having my 
little guy take the pics and it didn't go so well :)

B) my point of posting these is to inspire others
and give them ideas for their own wardrobes.
I want them to imagine THEMSELVES in them.

AND LASTLY....

C) it's fun! I love laying them out and making 
the collages. I feel like I'm doing an editorial 
in a fashion magazine or something. 
Pin It

Thursday, May 17, 2012

~teacher appreciation flowers~

 I wanted to do something for my little man's 
pre-school teachers. They have made such a difference
in his life and personality this past school year.
I didn't have much money for gifts but this is 
what I came up with:
 I found these little watering can planters
at the Dollar Store. I filled them with some
petunias and made a circular tag with the message
"Your love has made me BLOSSOM".
(the meaning of petunias: your presence soothes me)
 I printed it up on some card-stock, put his picture
in the center and had him sign the back. 
I attached the tag with white embroidery thread.  

I had never printed text in a shape before now.
If you want to know how I did it, check out this tutorial
at Imperfectly Perfect. (click here)
 It was just the right size for his little hands and
he was so excited to give them to his teachers.
 Thank God for teachers who make a difference. 
As he starts school, I am hoping and praying 
he will be blessed with teachers as loving 
and dedicated as the teachers he had this year. 

And guess what?
The book I made him was a BIG HIT!

Pin It

Total Pageviews