Showing posts with label repurposed goods. Show all posts

Saturday, April 25, 2015

~Memory Blanket....made from clothes~


For me, what makes hand made 
gifts so special is the love 
and emotion that goes into it.
I'm thinking of the person I make it for 
throughout the entire process. 

This next thing I'm going to share with you
is one of the most emotional projects
I've ever worked on.

Eight and a half years ago, a very dear friend
of mine passed away suddenly, leaving two 
little boys and a husband behind. 
Her husband kept her clothes in the exact
place she'd left them in her closet and drawers
for six years. About two and a half years
ago, he asked me to go thru her clothes with him.
He wanted me to keep some of them to 
make blankets for the boys. 
Going thru her closet....that was rough.
tears. missing. laughter. memories.

I brought the clothes home that I'd set aside for the blankets
and had to wait another year and a half before
I had it in me to start working on the blankets.

I had a good excuse and a deadline....
her oldest son was getting married. 

I started it a couple months in advance. I'd
never made a blanket out of T-shirts before and I
had no idea how I was going to pull it off. 

This wasn't a project I went balls to the walls
and completed in a couple days...I could have...
but there were times I just had to put it aside
and step away. Man...I miss her.

There were also times it was like she was
sitting right next to me as I was working
on it. I swear I could have reached out and
touched her....I can't describe it. 
She was here...with me, making this for her son...and it's
like it was a gift from her too. 


I wanted to make sure the clothes I was choosing
held memories for her son as well.
The panels are from T-shirts, pajama pants, 
sweatshirts, her work shirt, swim shorts, etc.
I sewed the panels together, put a layer of batting 
in between and backed it with a flat sheet.


A couple of the panels had pockets on them.
I printed up pictures of her on fabric paper,
backed them with fabric from more of her clothes,
and hid them in the pockets. 
 This one is a pic of her and her oldest boy,
when he was about 5 or 6 years old...we were sledding.
I got the saying I printed on the pic from a 
children's book....I can't remember the name of the book.
I thought the words were PERFECT.

I was pleased with the finished product.
It gave me a great sense of accomplishment...
Her son loved it, he cried when he got it.

The ceremony was beautiful and heart wrenching all
at the same time. It hurt my heart that it was such
a big day for her son and she didn't live to see it.
This mourning business is so complex.
Lots of hidden cracks and crevices.
Just when you think you've moved on and 
accepted it....BAM! 
She may not have lived to see it but she
was there that day....and she was happy...
and she was proud of her boy. 
And so am I.


Pin It

Tuesday, June 25, 2013

~recycled hair pretties~

 I pull my hair up. A lot.
Like...almost everyday.
Especially in the summer.
It's just too hot to wear it down most days. 
I love a little bling in my hair and
I got this bright idea to refashion a couple 
of REALLY old barrettes that I haven't worn
for a long time. I haven't got rid of them because
I like the size....one is real big and the other is real small.
They were very plain and boring...which is why 
I rarely used them. Honestly-I'm shocked I've
kept them this long.

I took this:
 ...and turned it into this:

 My little guy took the pics and was so proud of himself.
"Ooh...this is a good one Mom."

The small barrette I didn't get a before picture of.
It was just a little, clear barrette. 
This is what it looks like now:

I wear this A LOT now.
I actually didn't have to use the E-6000 glue
for these. The embellishments already had an
adhesive on them and they stuck really well
to the barrettes. I found these embellishments
in the scrapbook section at Michael's.
They are scrapbook stickers! 
Who would have thought?

This is about the easiest refashion I have 
EVER done. And I figure all the hairspray
I use will just help to permanently affix 
these do-dads onto the barrette. 


Pin It

Thursday, October 11, 2012

~silky shirt transformation~

 My friends all know I love to re-vamp clothes
and because of that I often become the recipient of
bad shirts like this:
It's OK for me to say the shirt was bad.
My friend knew it when she gave it to me 
and she never wore it herself. Her Mom,
bless her heart, gave her this shirt to wear
for a job interview......LAST YEAR!
Needless to say, my friend didn't wear it 
to the interview. Instead she gave it to me.
I love the challenge of taking something that 
is not wearable (for my taste) and transforming
it into something that I love. 
I love polka-dots and really wanted to 
find a way I could wear this.

This is what I came up with:

I wanted to give it a more modern shape.
The first thing I did was cut that elastic band
off the bottom of it and turned it under with a hem. 
After that took off the buttons and
sewed it together right up the middle. Next I changed the 
neckline to be a v-neck instead of that round crew neck (ugh).
The last thing I did was make a cut-out at the shoulder
and tucked the sleeve at the top and bottom.
 I like the final product and I think I'll wear it a lot.
It's one of those shirts I can wear when 
I'm feeling chubs because it's forgiving 
and hangs nice but it also has that little edge
I like in my clothes :) 
And really, how often do you say,
"My shoulders look fat today."
NEVER!


Pin It

Monday, October 8, 2012

~embellished girls boots~

 My little lady LOVES boots and she has outgrown
the 2 pairs she had. She keeps trying to squeeze her
little chubs into them and gets seriously pissed 
that no matter how hard she tries they just WILL NOT fit.

I pulled out these little winter boots I saved 
from when our son was a babe.
Truth be told, they were fine and feminine enough
just like this. In fact-I tend to think they tip more
on the feminine side than the masculine side.
BUT-they were the only warm boot we could find
for our son when he was a babe and we went with it.
When he wore them they actually didn't look 
girly at all because the fur was always covered.

I don't know if it's because I associate them with
my son or if it's because I just love to embellish things
but YOU KNOW I had to add a few little things to
make these scream, "GIRL! girl! GIRL!"
 I found some embellishments in my collection here at home
so I didn't have to buy anything. I have intended to make
some leg warmers for her with the long socks but 
need to wait until she gets a little bigger. I cut a little off
the top to use for this....leaving enough to still allow
for the legwarmers when I am ready to make them.
 It's easy.....just pull out your glue gun and start gluing!
I did it in 5 minutes.
I slipped the sock over the top of the boot to see if
I liked them (which I DIDN'T) but my little lady 
threw a fit when I tried to take it off. Here's a picture of
them on her feet.....cute huh?

 I like them better without the sock around the top.
 What do you think?
Pin It

Wednesday, June 6, 2012

~t-shirt transformation~

 My friend's son has really cool taste in 
t-shirts. He likes them rock-n-roll style.
On Sunday I was lucky enough to intercept 4
of these shirts that he had discarded into the 
"donate" bag because they no longer fit him.
SCORE!
These are the exact shirts I love to transform.
I've already re-vamped two of them....
Here's the first one:
One thing I love about re-vamping t-shirts is 
that they are so easy and they don't have to
be perfect to be cute and wearable. 
I mean....it's just a t-shirt. 
 The first thing I do when I re-vamp a shirt is 
cut off the crew neck collar.
HATE THEM.
For a person who is well endowed in the boob
department and very short (which I am both)
-crew necks ARE NOT flattering.
In fact, in my humble opinion, crew necks
are really not flattering on most people.

After cutting the neckline much bigger, I needed
to do something to bring it in so I made this little
tuck in the center. I then cut the sleeves off a little
and  did pull thru slits all the way up both sleeves.

I still needed it to fit tighter around the neckline
so I went ahead and did pull thru slits across
the top back of the shirt.  

Not perfect.....not any of it.....
but it's cute anyway and has more personality
than just a plain 'ol t-shirt. 

And here's the back story to this concert shirt.
TRAPT.....
A spur of the moment concert that Jolie
and I went to. I had just had my daughter
about 3 weeks prior and I was needing
to get out of the house. The concert was
at a small venue downtown.

At some point during the 
concert the place in which we were standing
had turned into a mosh-pit and we were 
almost dead center of it. Jolie puts her arms
out and screams as she's dragging me out 
of it, "Precious cargo! Full momma boobs
right here folks! Make a path!" 
Obviously-I had VERY 
full boobs because I had a newborn baby
at home and they were extremely tender AND FULL 
at that point in the night. 

Jolie wanted to get her little guy a
shirt from the concert and this was the shirt
she got him. We ended up meeting 
the band after the show......
Two words.
Douche. Bags.

At least the shirt is cute.

Pin It

Sunday, June 3, 2012

~skirt turned dress tutorial~

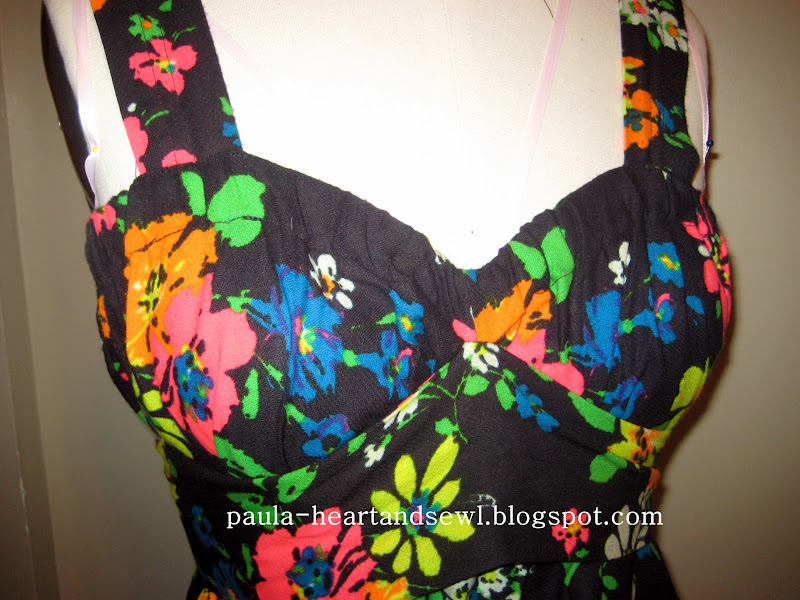
 Remember this skirt:

...that I turned into this:

For any of you interested in doing this
EASY transformation, here's how I did it.

Let me just tell you before we get started...
my pictures suck! There's just no way around
that at this point so I just had to make due
with the pictures I had. I hope between the 
pictures and the written instruction, you
will be able to follow. 

First off-start with a long skirt. I got
this skirt at a local thrift store for $5. 
It can be any material but I recommend a cotton
or polyester blend....these will be easiest to hem.
IT HAS TO HAVE AN ELASTIC WAISTBAND!

Next-put the bra on that you intend to wear
with the dress once it's complete....this is important
because you want to make sure and place the
straps of the dress so they cover your bra straps.

Put the skirt on and pull it clear up over your boobs
in order to determine how long you want it and
how much you'll need to take off the bottom. 
Place a pin where you want the length to be.
Take the skirt off now and let's begin!

You've marked with the pin where you want 
the length of the skirt to end up so we need
to add a bit for a hem allowance. From the
point of the pin, add an inch towards the bottom
of the dress (this is our hem allowance) and mark
with your marking pen or chalk. 

Now, you will need
to measure the distance of the bottom of the original
hem to the mark you just made.....mine was 3".
Now go around the entire skirt, making a 
mark every couple inches to determine where you
will need to cut. Be sure to measure from the bottom of
the original hem in order to ensure a straight
hem on your new length.  

Once you have marked around the entire skirt,
you are ready to cut. You will basically just
connect the marks you just made while cutting
with your scissors or blade.

 Be sure to lay your skirt out so that you
are only cutting thru ONE LAYER!
Also-you need to cut this off in one continuous piece.
This fabric we just cut off will be used for our straps.
Once you have completed cutting the bottom of the skirt
off, put that piece to the side...we'll come back
to it in a minute.

Let's go ahead now and put a new hem on the 
bottom of the skirt. I turned mine over 1/2" TWICE
so I had a finished edge. Mark it with your 
seam gauge, pin and iron as you are marking it.
Now go ahead and sew it.
Next we are going to make our straps.

Take the big piece you just cut off from the
bottom of the skirt. Determine how wide you
want your straps to be. If the piece you cut off is
extremely wide you'll need to cut some of it
off again so it's not too bulky. I simply
folded the unfinished edge over to meet the 
center of the already finished edge and that was
perfect (My straps are 1.75" wide).
 Go ahead and iron it down.
 
 If you have a serger I would recommend serging
the raw edge before you fold it over and iron it
down. However, I don't have a serger so I didn't
finish the edge first.....I figure it won't show and
I didn't want to take the time to finish the edge.
Hopefully it won't fray too bad when I wash it.

Now you can sew the piece down.
I went ahead and made two stitch lines down
the length of the strap in the center because I thought it
looked better that way. Depending on the type of 
stitch that was in the original hem, you may already
have a visible stitch. If this is the case-be sure to
sew this down using the existing stitch as a 
guide to determine the distance apart for the 2nd
stitch you are about to put in. Does that make sense?
You want the stitches to be straight because
they will be very visible on the straps.

 Now you should have a big long piece of fabric with 
finished edges. Go ahead and cut it in half.
 This next part is MUCH EASIER if you have someone
who can help you. I didn't and it took me forever!
You need to determine the placement of the straps now
so put the dress on, pulled up over your boobs. 
Remember to have the bra on that you intend to 
wear with the dress. Have someone pin the straps
onto your dress both in the front and the back.
 You are going to sew this right onto the dress
now but you don't want to sew thru the elastic.
You still want the elastic to be able to stretch and move
so be careful to pin and sew at the top and bottom
of the casing NOT thru the elastic.

 Sew both straps on.
Almost done.....now we want to sew the sash onto
the front of the dress. This is what makes the 
sweetheart-type neckline and fitted bust look.

The skirt I bought already had a very long sash attached 
to it so I just used that. If you need to make one,
You can either use a scarf you already have
or you will need to sew another long strap that
is approximately 3.5 " wide and 6 ft long.
Most likely you won't have enough fabric from the 
bottom of the skirt to make a sash with also.
That's OK. I actually think it would have
been cuter if I had used a different fabric for the sash.
(in fact-I'm going to try that next time)

If you have to make a sash from scratch-you will need a 
piece of fabric that is 8" wide by 6 ft 1 inch long.
Fold it in half lengthwise, right sides together
and stitch it together using a 1/2" seam allowance.
Do not sew the two ends.
Now you turn it right side out by pulling
one end thru to the other end. Iron it
and after turning your ends under, 
sew the ends shut.
Now you have your sash.

Fold your sash in half lengthwise and pin the
center of it to the center of the bust of your dress,
right directly underneath the bottom stitch
from the elastic casing. 
Stitch this onto the dress,
being sure again to not stitch thru the elastic.
You don't need a long stitch line for this because
you want it to be sewn onto it with just
a SMALL stitch length. 
Mine is only like 3 stitches that I just
re-enforced several times using my back stitch.

THAT'S IT!
You're done.

Put the dress on and pull the sash down underneath
your boobs and pull tight around to the back.
Tie and adjust as you need to.

 Voila....
a new sundress made from a skirt.
Guess what?
You just made a dress that can be worn 3 ways.
If you want more coverage in the front you
can turn it around and wear it like this:
This offers more coverage in the boobie/cleavage
department....the tie is in the front now. 

I don't have pictures of this but you can also
wear it as a maxi skirt with a sash tied at the waist.
I've worn it all 3 ways and trust me.....
it's equally as cute each way!

Again, I apologize for the crappy pics in this 
tutorial......the tutorial took me longer to
create than the entire dress did!

 Linking up with Positively Splendid.
and


Pin It

Friday, May 4, 2012

~faux milk glass vase~

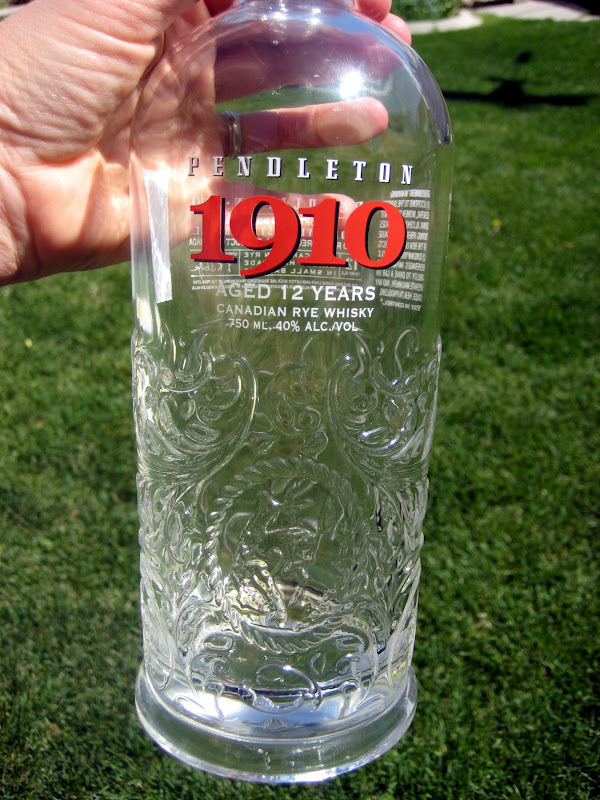
 What to do with a bottle of fine Canadian whiskey
(besides drink it)........
Spray it with this.....
 and you get this...
Pretty isn't it?
Getting the bottle was a bit of a laugh.
Last weekend at a party, our friend, Derek, was 
offering drinks with this fine whiskey.
I turned down the whiskey (not a whiskey fan) but
asked him what he was going to do with the bottle.
His response..."I'm going to drink it!"
OK. Duh Paula.
Maybe I should have made myself more clear.
"What are you going to do with the bottle after it's gone."

After I clarified my question he told me I could have the bottle
when it was gone. I thought I'd get it in a couple weeks.
NOT BY THE END OF THE NIGHT!
In his defense, he wasn't the only one drinking it. 
Apparently it went down real fast and smooth...

Although I didn't like the whiskey, I LOVED 
the design on the bottle. I knew immediately
what I wanted to do with it. 
 I had to spray about 5 or 6 coats of paint to
cover the painted label on the bottle. 
I love the delicate, intricacy of the bottle.
Because only a flower or two can fit in it,
it allows the focus to be the bottle, even when 
filled with flowers. 
The flowers I have in here now are little tiny
flowers from my chives.....it's what happens
when you let them grow too long. 

I think I'm going to spray a couple more bottles I 
have laying around the house here.
I'm envisioning a few of them clustered
in the center of my dining table.......

Pin It

Total Pageviews