Showing posts with label DIY. Show all posts

Sunday, January 12, 2014

~Handmade Wire Swirl Rings~

 Sometimes my favorite creations happen when
I'm sitting with my supplies, pre-occupied with 
a phone conversation or something else and
I just start tinkering around. 
Like these: the rings I made for a few of my girlfriends
for Christmas gifts. 
It all started with this ring:
 I loved it so much I decided to go ahead 
and make a couple more. 
They literally took like 10 minutes to make.

They aren't the sturdiest or best quality and
they will for sure turn the finger green if 
they get wet. I don't want to buy high quality (expensive)
wire until I get my technique down better. 
I've made a few more since these and I get
a little better with each one. I'd love to learn 
how to spell out words or names with the wire. 

I go thru phases with my jewelry making. 
Right now I'm in a wire phase. I love all the
different ways it can be manipulated and transformed. 
Wait till you see the beautiful bracelets I
made with wire to go with these rings......
next time.
Hopefully within 2 months time but I wouldn't hold
your breath......just in case. 

Happy 2014 Heart-and-Sew'l Readers!
Pin It

Monday, May 13, 2013

~easy studded earrings~

 I've been looking for pronged studs for a DIY 
project for a couple months. I'm not having 
any luck at my local craft/fabric stores and I 
think I'll have to break down and order them online.
In the search I did come across some cute 
studded shapes......in the scrap-booking department
at Michael's. The only problem is they are stickers.
Despite the fact that they're stickers, 
they are actually really sturdy.
They won't work with what I was hoping for
but they will work for a bunch of other fun projects.
Like this:
       I made these fun little stud earrings by
gluing an earring back to the back of it with
a dab of E-6000. 

It took 1 minute. They've become a 
fun little staple in my accessories collection. 

Now that I have these fun studs, I have a few projects
lined up that need a lil bit of be-dazzle!      

Pin It

Sunday, October 14, 2012

~my DIY studded cuffs~

 I've been wanting a pair of rockin cuffs
for awhile now....for those days that I feel like a 
SUPERHERO....
or a ROCK STAR....
or a TEENAGER.  
Most days I just feel tired. 
 
I found these faux studded headbands at the
Dollar Store and knew I'd hit the jackpot.

The only materials needed besides the plastic
studded material are velcro and glue.
I initially tried hot glue and it DIDN'T work.
I had to go in for the big guns and pull 
out my E-6000. It worked GREAT....
and in my opinion it smells good too :)
I cut the plastic studs the size of my wrists and 
attached a thin piece of velcro to each end 
as a closure method.


 Be sure to attach the velcro to the opposite sides
at the ends so it lays flat. 
(one piece to the under-side and 
the other to the up-side) 
 I was able to make both of these with just
one headband. I'm not gonna lie.....they are a bit
itchyscratchy but I'm willing to deal 
with a little bit of discomfort for the sake
of fashion. I can attach a lining of
felt or softer material to the underside if
I want it to be softer.      
 I can also stack them for a really wide cuff.
Not bad for a dollar eh?
Just the right balance of bling, rock and trend
for my taste......and my budget :)

Hope your weekend has been fun  
Pin It

Friday, September 21, 2012

~DIY moto jacket made from a vest~


Remember the moto-jackets I mentioned a 
couple weeks ago? 
No?!
Here's a reminder:
It's all coming back to you now isn't it?
I took that old vest I had out of my donation bag
(yes...it was THAT close to being gone)
and did this:
 
  And the final result was this:

I LOVE IT.
Wore it to a play last night over a FABULOUS dress
that I purchased at the thrift store for $6.
I feel a "thrifty finds" post coming on :) 
This sweet little number took me a total of 30 minutes.
No joke.
ANYONE can do it.
I'm going to be wearing this a lot this fall.
It's so versatile....much more so than the
vest ever was on it's own. 
Funny how that works.
I wouldn't have thought that.
Sometimes I guess you just have to not think :)
Happy weekend everyone.
Pin It

Thursday, September 6, 2012

~shirt inspired from "I Spy DIY" book~


This book.....
....has soooo many fun ideas in it!
 
I made a shirt inspired by one of her ideas
in the book. Hers is made with a scarf and mine
was made with fabric I have had for years, not 
knowing what to make with it. I had about a 
yard of fabric and cut it out in the shape 
of two scarfs. It's basically two squares sewn
together, leaving an opening for the neck and arms.
I didn't even have to hem it.
Instead, I burned the edges.
An idea I wouldn't have thought of on my own
and it was sooooo much faster.
 
Here's my version:
 I know these self portraits are killing you.
They kill me too and I CANNOT for the life of me
get a decent shot ANYWHERE in my house.
Ugh.
 
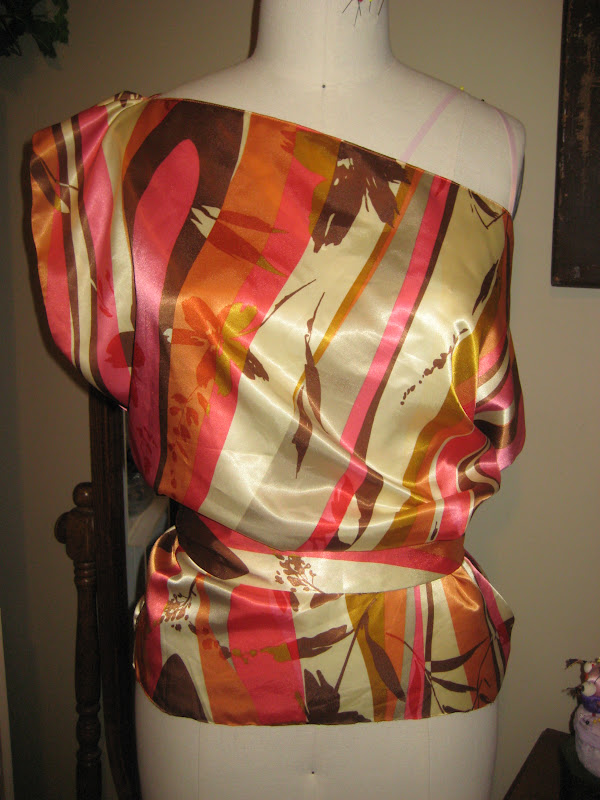
Here's a pic of it on my dress form-it gives
you a better idea of what it looks like.
 I made the neckline extra wide so it falls
off my shoulder. The pink ribbons are just
for draping and marking on my form, they aren't
actually part of the shirt. 

I made it especially for a special summer concert
with some of my favorite gals:
 I loved the finished product and the concert
wasn't half bad either......come to think of it-
the concert ROCKED! 
I'm adding Grace Potter to the list of
celebrities I want to be friends with.
 

Pin It

Sunday, September 2, 2012

~shirt made from a scarf~

 I've had these scarfs for years and years and never
really worn them with anything.
The leopard scarf is one of those really big,
square scarfs and the turquoise scarf is long
and narrow. I haven't been able to find a 
great way to wear either one of them......
UNTIL NOW. 

 The leopard scarf wasn't quite
big enough to give me the coverage I wanted in
the back so I sewed the turquoise scarf onto
the bottom of it....it's in the back.
 I will take pics of this on
my dress form so you can get a better idea.
These were the best pics I could get of it on me.
 I used three blingy pins to close it up and it 
works surprisingly well. 

The necklace I'm wearing is another I've made
recently. I'll showcase it in another post soon.

If you want to see a tutorial on how to do this shirt,
leave me a comment and let me know.
Making the shirt is more simple than
making the tutorial :)


Linking up with Positively Splendid

Pin It

Thursday, August 9, 2012

~wire heart bracelet inspired by "I Spy DIY"~

 Another blog I love is 
She also has a book. I will soon share with you
 the projects I did from her book.

Today I want to show you the bracelet I made
a couple weeks ago, inspired by her.
 The link to her blog above is for a ring she made
out of wire, I swear I've seen a bracelet too
but I can't find that link. I don't know how she gets
her wire so smooth and intricate....practice I guess.
I made a hook to go thru the heart to 
latch it onto my wrist.

 I finished it off by wrapping the wire around itself.

I've been wearing it everyday, stacked with my other 
wrist baubles :) I think I'll try the ring next....or
maybe adding a charm to it.
Pin It

Wednesday, August 8, 2012

~Faux Lace Tank-DIY inspiration from PS i made this~

 In the past I've always re-vamped shirts and clothes
by cutting them up, changing the shape, or making them 
something else entirely. I've recently discovered how
much fun it is to re-vamp clothes with fabric paint.

I saw this idea at "P.S. I Made This"
and knew I had to do it.....pronto!

 +
+
 =

Cute isn't it?
It was so easy. 
I got the tank at Michael's for $4.
The fabric spray paint was on clearance for $3.
I used a lace shirt I had in my closet that I haven't worn
for awhile. It was too tight and I felt roly poly in it.
 I cut the front section off like this
so I could lay it over the front of the tank:
Then I placed this piece over the tank top.
Be sure to have cardboard or something in between
the front and back of the shirt or the paint will soak thru.
Now spray.
Remove the piece of lace and let dry.
Up close:
That's it!
Check out the one she made at
(click above to be directed).
Hers is way cuter and more detailed than mine.
And if you haven't browsed thru her blog
at her fun DIY's, you should.....
there are so many fun ideas.


Pin It

Saturday, June 30, 2012

~old bottle turned girly vase~

 I am going thru this phase where I want to
make everything in my house WHITE.
I want to buy a shload of white spray paint 
and just go to town. My brain is so consumed
with what I have to do each and every day
that it feels like I have a lot of clutter in my head.
Because of this, I am trying to diminish the 
real, tactile clutter in my house. I just want clean,
white, easy, breezy, beautiful (cover-girl),simple,
monochromatic EVERYTHING right now.
 
I actually love rooms where everything is white or
very muted and earthy. Just because a room
is all white doesn't mean it's boring. By using
many different TEXTURES of white stuff,
it looks interesting and multidimensional. 
Add in VERY FEW pops of color just in a 
couple little details and that's the look I 
am loving right now.

And now finally, the whole point of this post;
found this old bottle while up camping and decided
(of course) to spray paint it white. I thought I would
do something a little different and make stripes 
on it. It turned out like this:
Didn't like it. Even with a flower that isn't pathetic
and limp looking, it still looked weird and harsh.
So-I stumbled upon a great idea at the blog
"A Beautiful Mess" and knew immediately 
what I was going to do to salvage this cool bottle.
click (here) for their version
This is my version:
 Cover the stripes with white lace and buttons.
I had everything here on hand and did it in 10 minutes.
White on white with lots of texture.
 Doesn't it look lovely?
It's gone from being a weird old bottle I mucked up
with stripes to a feminine, delicate and 
fabulous VOZ (exaggerate that "O").
A nice little addition to my collection.

Next project on the docket this week:
lampshade re-vamp to fit this great little
vintage glass lamp base I found at Goodwill.
Pin It

Total Pageviews