Showing posts with label women's clothes. Show all posts

Thursday, October 11, 2012

~silky shirt transformation~

 My friends all know I love to re-vamp clothes
and because of that I often become the recipient of
bad shirts like this:
It's OK for me to say the shirt was bad.
My friend knew it when she gave it to me 
and she never wore it herself. Her Mom,
bless her heart, gave her this shirt to wear
for a job interview......LAST YEAR!
Needless to say, my friend didn't wear it 
to the interview. Instead she gave it to me.
I love the challenge of taking something that 
is not wearable (for my taste) and transforming
it into something that I love. 
I love polka-dots and really wanted to 
find a way I could wear this.

This is what I came up with:

I wanted to give it a more modern shape.
The first thing I did was cut that elastic band
off the bottom of it and turned it under with a hem. 
After that took off the buttons and
sewed it together right up the middle. Next I changed the 
neckline to be a v-neck instead of that round crew neck (ugh).
The last thing I did was make a cut-out at the shoulder
and tucked the sleeve at the top and bottom.
 I like the final product and I think I'll wear it a lot.
It's one of those shirts I can wear when 
I'm feeling chubs because it's forgiving 
and hangs nice but it also has that little edge
I like in my clothes :) 
And really, how often do you say,
"My shoulders look fat today."
NEVER!


Pin It

Friday, September 21, 2012

~DIY moto jacket made from a vest~


Remember the moto-jackets I mentioned a 
couple weeks ago? 
No?!
Here's a reminder:
It's all coming back to you now isn't it?
I took that old vest I had out of my donation bag
(yes...it was THAT close to being gone)
and did this:
 
  And the final result was this:

I LOVE IT.
Wore it to a play last night over a FABULOUS dress
that I purchased at the thrift store for $6.
I feel a "thrifty finds" post coming on :) 
This sweet little number took me a total of 30 minutes.
No joke.
ANYONE can do it.
I'm going to be wearing this a lot this fall.
It's so versatile....much more so than the
vest ever was on it's own. 
Funny how that works.
I wouldn't have thought that.
Sometimes I guess you just have to not think :)
Happy weekend everyone.
Pin It

Thursday, September 6, 2012

~shirt inspired from "I Spy DIY" book~


This book.....
....has soooo many fun ideas in it!
 
I made a shirt inspired by one of her ideas
in the book. Hers is made with a scarf and mine
was made with fabric I have had for years, not 
knowing what to make with it. I had about a 
yard of fabric and cut it out in the shape 
of two scarfs. It's basically two squares sewn
together, leaving an opening for the neck and arms.
I didn't even have to hem it.
Instead, I burned the edges.
An idea I wouldn't have thought of on my own
and it was sooooo much faster.
 
Here's my version:
 I know these self portraits are killing you.
They kill me too and I CANNOT for the life of me
get a decent shot ANYWHERE in my house.
Ugh.
 
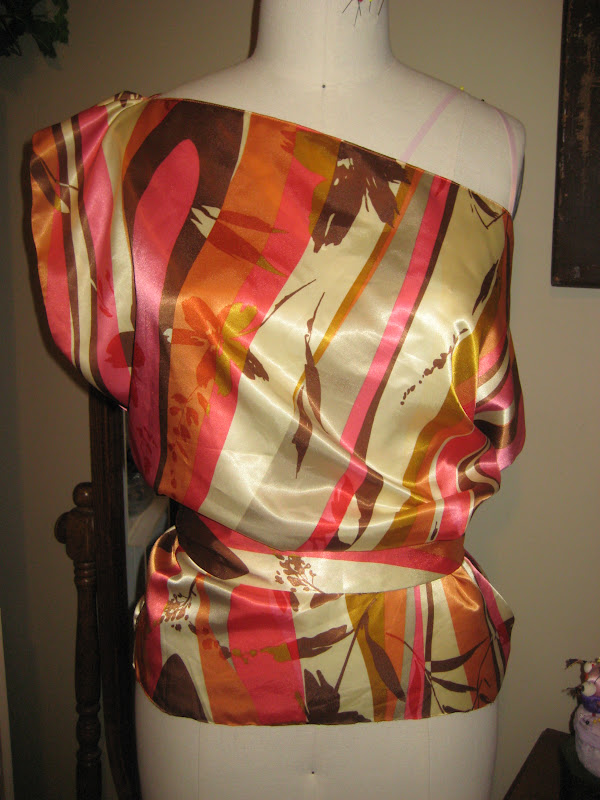
Here's a pic of it on my dress form-it gives
you a better idea of what it looks like.
 I made the neckline extra wide so it falls
off my shoulder. The pink ribbons are just
for draping and marking on my form, they aren't
actually part of the shirt. 

I made it especially for a special summer concert
with some of my favorite gals:
 I loved the finished product and the concert
wasn't half bad either......come to think of it-
the concert ROCKED! 
I'm adding Grace Potter to the list of
celebrities I want to be friends with.
 

Pin It

Sunday, September 2, 2012

~shirt made from a scarf~

 I've had these scarfs for years and years and never
really worn them with anything.
The leopard scarf is one of those really big,
square scarfs and the turquoise scarf is long
and narrow. I haven't been able to find a 
great way to wear either one of them......
UNTIL NOW. 

 The leopard scarf wasn't quite
big enough to give me the coverage I wanted in
the back so I sewed the turquoise scarf onto
the bottom of it....it's in the back.
 I will take pics of this on
my dress form so you can get a better idea.
These were the best pics I could get of it on me.
 I used three blingy pins to close it up and it 
works surprisingly well. 

The necklace I'm wearing is another I've made
recently. I'll showcase it in another post soon.

If you want to see a tutorial on how to do this shirt,
leave me a comment and let me know.
Making the shirt is more simple than
making the tutorial :)


Linking up with Positively Splendid

Pin It

Sunday, June 3, 2012

~skirt turned dress tutorial~

 Remember this skirt:

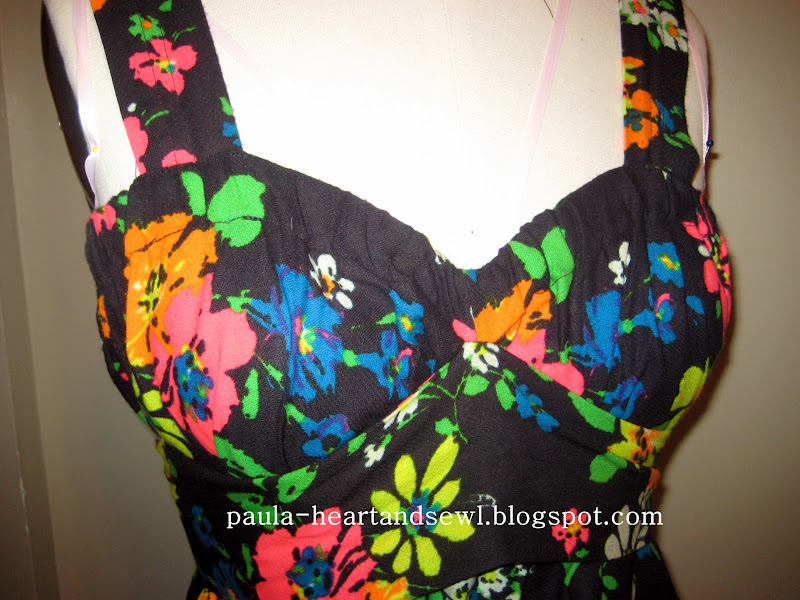
...that I turned into this:

For any of you interested in doing this
EASY transformation, here's how I did it.

Let me just tell you before we get started...
my pictures suck! There's just no way around
that at this point so I just had to make due
with the pictures I had. I hope between the 
pictures and the written instruction, you
will be able to follow. 

First off-start with a long skirt. I got
this skirt at a local thrift store for $5. 
It can be any material but I recommend a cotton
or polyester blend....these will be easiest to hem.
IT HAS TO HAVE AN ELASTIC WAISTBAND!

Next-put the bra on that you intend to wear
with the dress once it's complete....this is important
because you want to make sure and place the
straps of the dress so they cover your bra straps.

Put the skirt on and pull it clear up over your boobs
in order to determine how long you want it and
how much you'll need to take off the bottom. 
Place a pin where you want the length to be.
Take the skirt off now and let's begin!

You've marked with the pin where you want 
the length of the skirt to end up so we need
to add a bit for a hem allowance. From the
point of the pin, add an inch towards the bottom
of the dress (this is our hem allowance) and mark
with your marking pen or chalk. 

Now, you will need
to measure the distance of the bottom of the original
hem to the mark you just made.....mine was 3".
Now go around the entire skirt, making a 
mark every couple inches to determine where you
will need to cut. Be sure to measure from the bottom of
the original hem in order to ensure a straight
hem on your new length.  

Once you have marked around the entire skirt,
you are ready to cut. You will basically just
connect the marks you just made while cutting
with your scissors or blade.

 Be sure to lay your skirt out so that you
are only cutting thru ONE LAYER!
Also-you need to cut this off in one continuous piece.
This fabric we just cut off will be used for our straps.
Once you have completed cutting the bottom of the skirt
off, put that piece to the side...we'll come back
to it in a minute.

Let's go ahead now and put a new hem on the 
bottom of the skirt. I turned mine over 1/2" TWICE
so I had a finished edge. Mark it with your 
seam gauge, pin and iron as you are marking it.
Now go ahead and sew it.
Next we are going to make our straps.

Take the big piece you just cut off from the
bottom of the skirt. Determine how wide you
want your straps to be. If the piece you cut off is
extremely wide you'll need to cut some of it
off again so it's not too bulky. I simply
folded the unfinished edge over to meet the 
center of the already finished edge and that was
perfect (My straps are 1.75" wide).
 Go ahead and iron it down.
 
 If you have a serger I would recommend serging
the raw edge before you fold it over and iron it
down. However, I don't have a serger so I didn't
finish the edge first.....I figure it won't show and
I didn't want to take the time to finish the edge.
Hopefully it won't fray too bad when I wash it.

Now you can sew the piece down.
I went ahead and made two stitch lines down
the length of the strap in the center because I thought it
looked better that way. Depending on the type of 
stitch that was in the original hem, you may already
have a visible stitch. If this is the case-be sure to
sew this down using the existing stitch as a 
guide to determine the distance apart for the 2nd
stitch you are about to put in. Does that make sense?
You want the stitches to be straight because
they will be very visible on the straps.

 Now you should have a big long piece of fabric with 
finished edges. Go ahead and cut it in half.
 This next part is MUCH EASIER if you have someone
who can help you. I didn't and it took me forever!
You need to determine the placement of the straps now
so put the dress on, pulled up over your boobs. 
Remember to have the bra on that you intend to 
wear with the dress. Have someone pin the straps
onto your dress both in the front and the back.
 You are going to sew this right onto the dress
now but you don't want to sew thru the elastic.
You still want the elastic to be able to stretch and move
so be careful to pin and sew at the top and bottom
of the casing NOT thru the elastic.

 Sew both straps on.
Almost done.....now we want to sew the sash onto
the front of the dress. This is what makes the 
sweetheart-type neckline and fitted bust look.

The skirt I bought already had a very long sash attached 
to it so I just used that. If you need to make one,
You can either use a scarf you already have
or you will need to sew another long strap that
is approximately 3.5 " wide and 6 ft long.
Most likely you won't have enough fabric from the 
bottom of the skirt to make a sash with also.
That's OK. I actually think it would have
been cuter if I had used a different fabric for the sash.
(in fact-I'm going to try that next time)

If you have to make a sash from scratch-you will need a 
piece of fabric that is 8" wide by 6 ft 1 inch long.
Fold it in half lengthwise, right sides together
and stitch it together using a 1/2" seam allowance.
Do not sew the two ends.
Now you turn it right side out by pulling
one end thru to the other end. Iron it
and after turning your ends under, 
sew the ends shut.
Now you have your sash.

Fold your sash in half lengthwise and pin the
center of it to the center of the bust of your dress,
right directly underneath the bottom stitch
from the elastic casing. 
Stitch this onto the dress,
being sure again to not stitch thru the elastic.
You don't need a long stitch line for this because
you want it to be sewn onto it with just
a SMALL stitch length. 
Mine is only like 3 stitches that I just
re-enforced several times using my back stitch.

THAT'S IT!
You're done.

Put the dress on and pull the sash down underneath
your boobs and pull tight around to the back.
Tie and adjust as you need to.

 Voila....
a new sundress made from a skirt.
Guess what?
You just made a dress that can be worn 3 ways.
If you want more coverage in the front you
can turn it around and wear it like this:
This offers more coverage in the boobie/cleavage
department....the tie is in the front now. 

I don't have pictures of this but you can also
wear it as a maxi skirt with a sash tied at the waist.
I've worn it all 3 ways and trust me.....
it's equally as cute each way!

Again, I apologize for the crappy pics in this 
tutorial......the tutorial took me longer to
create than the entire dress did!

 Linking up with Positively Splendid.
and


Pin It

Wednesday, May 23, 2012

~skirt into dress~

 Remember this thing I showed you a couple days ago?
Not the most attractive like this but I had a vision for it
the moment I saw it.
 I've been seeing a lot of neon colors
this season and wanted to add some of it into my 
wardrobe without spending a lot of money. 
I feel pretty confident in saying that I think neon
will be a micro-trend; lasting only this summer.
Taking that into account, the asking price of $5
at my local thrift store made it a PERFECT option
for spicing up my wardrobe. 
It's definitely a vintage piece....I'm pretty sure
straight from the 70's. 

Check out the final reformation! 

I LOVE it!
It's one of my favorite summer pieces
at this point. I think it's going to see a lot wear 
this summer. I was hoping to have the tutorial
done by now but it's not. I'm shooting for later today.
It was super easy and I did it in less than an hour!
Seriously......a beginner can do this!


Pin It

Saturday, May 19, 2012

~closet peek-a-boo~

 I haven't done "A peak inside my closet" for a 
couple weeks. The reason being; I haven't really
worn much worth photographing. Since I started
posting about what I wear on a daily basis I've 
learned a couple things about my wardrobe:
1) I wear a lot of black
AND
2) A lot of the stuff I wear isn't that great

Let me tell you....it's been a real kick in the butt 
to step it up with my wardrobe. 

Here's a few outfits I've worn the past couple weeks.
I wore this to a barbecue. This outfit is another one
of those examples of "buy nice stuff and it will last you forever".
I've had the skirt, the boots and the belt for several years.
The belt is AMAZING! I bought it at a vintage store
years and years ago.....long before the cheap imitations
of belts like this were popular. The buckle is sterling silver,
the leather is genuine and is is completely handmade. 
I think I paid $30 for it. The boots get cooler looking the more 
worn they become and the skirt is a staple piece of my
summer wardrobe. I also wear it belted as a dress.
 This outfit I wore to a sushi dinner for a friend's birthday.
I originally got the outfit for my Vegas trip in February.
I love the contrast of the lace with the tailored vest.
BUT....the best thing about this outfit-THE SHOES!
They make me soooo much taller.
I'm only 5'2 so they really give me a boost. 
Believe it or not, they are pretty comfortable.

This outfit I wore to my son's pre-school graduation.
It's basically a $20 outfit. The bracelet was more expensive
than everything else combined. Again....pieces I've 
had for a really long time. This beaded shrug
is an "occasion" piece that I feel so feminine and
pretty in each time I wear. It was only $5!

I've really been trying to bring some color into my
wardrobe since realizing my obsession with black clothes.

Wait and see what I did with this skirt:
 It may very well be my favorite summer 2012 piece!
I'll show you next week. 

To answer your question Jolie about why I don't 
photograph the clothes on me....there's a few
different reasons. 

A) it's quicker and easier for me to lay them out 
than to try and take the time to get a good
shot of me in them. I never remember to do it when I'm 
wearing them. I've tried setting my timer and using my
tri-pod but haven't been able to find a good spot
in my house to do that. I've also tried having my 
little guy take the pics and it didn't go so well :)

B) my point of posting these is to inspire others
and give them ideas for their own wardrobes.
I want them to imagine THEMSELVES in them.

AND LASTLY....

C) it's fun! I love laying them out and making 
the collages. I feel like I'm doing an editorial 
in a fashion magazine or something. 
Pin It

Wednesday, January 25, 2012

~leather and lace belt~

I love lace and I've been seeing it 
in people's fashion choices a lot lately it seems.
I got a big piece of thick lace a few weeks ago
with the intentions of adding it to a waistband
on a pair of pants of mine. 
Well, that didn't work out and I've been trying
to figure out how I could use it.

I saw this dress on Pinterest a few days ago
and knew immediately what I wanted to do with the lace:
Isn't this beautiful?
Seriously?!
Anyway, keep in mind this was just my inspiration.
Obviously I didn't make a dress like this.....YET :)
This is what I did:

I made a little lace belt to layer with other belts.
I know this shirt isn't the best with it and I didn't realize
 until I looked at the pictures tonight...yowza.
Next time I'm going to try it with a little shift dress.

Here's how I did it.

First off, buy enough lace to fit around your waist
with about 2 extra inches. Next you want to wrap the
lace around your waist where you'll be wearing it and
mark with pins the two meeting points on each end. 
Go ahead and fold the ends under about an inch.
 The pins represent the line I will be sewing my snaps on.

Now you want to take another piece of material that has
some body and stiffness to it. This is what you will be 
attaching the snaps to. I used some weird shiny black
material I've had for years. Cut a piece just big enough to
fit in between the two layers of the lace ends you 
just folded under. You'll want to use a piece
the same color as your lace so it doesn't stick out
like a sore thumb. 
 This is what it will look like:
Next you will be sewing the ends of your lace that you've
just turned under and placed the fabric strip into.

 Sew both ends under and it will look something like this:
Now the tedious part.....sewing on the snaps.
uggghh.
These were the kind I used.
 Make sure you have a "male" and a "female" part for
each snap. Determine where you want to place
them and sew them on. It was a little tricky
sewing a black snap onto a black piece of lace
with a black piece of thread....I poked myself a lot.
 Nice chipped nail polish eh?
So, once you've got them sewn on, it will look 
something like this. Remember, not both ends will
be turned under in the same direction. Since you want
them to meet and lay flat, one end will actually be 
turned up and the other end will be turned down.
Also, be sure to sew your snaps on the underside of
the piece that will laying on the top. On the other end,
you will sewing them on the top. Is this making sense?
Once you lay out the lace and start fitting it to you
I think you will see what I'm talking about.
I should have said that before now shouldn't I?
I learned this the hard way.
yeah...and I thought sewing the snaps was rough?
Try unpicking a black seam on a piece of black lace.
I can't believe I didn't destroy it.
I tried it with a couple different belts and 
it looked cute with all of them.
What a shame I didn't try a different shirt.
I am really loving the "leatha and lace" look.
Can't wait to try it with something else.


Total Pageviews