Monday, October 31, 2011

~mummy juice box~

My neighbor brought this Halloween treat over
for my little guy today:
How adorable is this?
A juice boxed dressed up like a mummy. 
What a great idea!
She wrapped white electrical tape around the juice
box and attached some googly eyes.

Looks like she re-attached the straw with a glue gun after
she wrapped it.
Most importantly....she left an opening for the straw:
I think this is such a good alternative to candy.
 My little guy isn't complaining either......
 I hope all you spooks have a
SAFE AND FUN HALLOWEEN!

Friday, October 28, 2011

~baked chicken chimi's~

Since the final episode of Project Runway isn't 
online yet this morning let's talk about a favorite topic of mine....
FOOD!

Don't you find one of the trickiest parts of dinner
is trying to come up with something different?
Most women I talk to feel like they make the same
things over and over. I do it too.

The fall season is like my cooking New Year.
The colder weather always brings with it a desire to
cook more and to cook different things.
It's like an awakening for my kitchen since I 
HATE cooking in the summer when it is hot.
A couple years ago I got this recipe from a friend 
for baked chicken chimichangas.
DEEE-LISH-US!
I dug the recipe out of it's hiding place after finding
that my friend had forgotten/lost the original recipe herself. 
Since she needs the recipe again too, I thought I 
would just share it on here so everyone
can partake in the goodness of this dish.

 This is most of the ingredients you will need for the actual chimis....
pretend there is shredded cheese in this picture.
-tortillas
(these are the BEST kind you can buy in the store)
-olive oil
-shredded chicken (I used 3 breasts)
-cream cheese
-taco seasoning
 -cilantro (optional)
-onions (optional)
-shredded cheese

First off you want to shred your chicken.
Now combine the cream cheese with the chicken....
use whatever it takes to make the consistency you want.
I used about 6 oz.
Add your taco seasoning (a packet) and 
remaining ingredients that you want in the 
chicken filling mixture.

Next you're going to put a hefty spoonful onto 
your tortilla and roll it up with the ends tucked in.
After you get it rolled place it on a baking sheet
and brush some olive oil on it.
This makes about 6 chimis.
Place them in oven after they are all rolled and oiled down.
350 degrees for about 25 minutes.

Now here's the REALLY good part.....the sauce!
I didn't take a picture of the ingredients but here's the list:

-1 can cream of chicken soup (10.5 oz)
-1 can green chilis (4 oz)
-1 jalapeno seeded and chopped
-1 Tablespoon fresh lime juice (about half a lime)
-cilantro (optional)

Put all the above ingredients in your food processor or blender
and liquefy. Transfer to a saucepan and heat up while your
chimis are baking in the oven.
It should resemble something like this.
Take your chimis out of the oven once they are slightly golden
and a little crustified. If you cook them too long they
puff up and explode. 
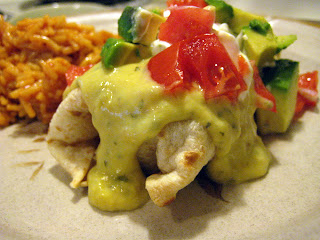
Garnish the chimi with some of this sauce and
whatever else you like.......
 Serve with Spanish rice and you've got yourself a 
delicious chimichanga platter without all the deep fried greasiness.
My 4 year old will even eat this!

I was thinking last night as I was cooking this....
you know you're getting old when instead of swapping
bar stories and cocktail recipes you are sharing
dinner recipes and reality T.V. schedules. 

Whatever recipes and stories you are sharing.....
ENJOY!

Linking up with Positively Splendid.

Wednesday, October 26, 2011

~my gnome is cuter than yours~

My little guy decided what his Halloween costume would
be months and months ago.
After watching Gnomeo and Juliet he was 
determined to be Gnomeo for Halloween.
In case you aren't familiar with this cartoon let me assist:
 Super easy and adorable. 
It seems that box of fabric my Mom gave me this past
summer happens to be the gift that keeps on giving.
I knew I had the supplies for the belt but I
thought I would have to go buy a big piece of blue
felt for this. Guess what was in the box?
A BIG PIECE OF BLUE FELT!
Praise the Lord in song.....preferably an Elton John song.
(he did all the music for Gnomeo and Juliet)

I winged the whole thing and loved the way it turned out.
My little man is thrilled and can't wait to wear it!


As far as the shirt goes...I just took a large piece of felt
and folded it in half. I got one of my little guys shirts and set it
on top to measure the length I needed to cut. 
 
I then cut a hole out on the top of the folded piece of felt for
his head. I should have taken a picture but you are going to 
be cutting the end that is folded. There will not be a seam at 
the shoulders because you just sew this up the sides now and
slip over their head. Is this making sense now? 


Next I took two half circles (more like ovals) and
sewed them to the front of the neck opening
on each side to make a collar.


The belt is made from some brown fleece I had on hand
and the buckle is yellow felt that I hand stitched on. 
It is fastened with Velcro.

For the boots I just bought a pair of men's black socks at
the Dollar Store and slipped them over his little work boots.
Total cost for this costume......$1.
This may be the cheapest Halloween yet.

He wants me to be Juliet and Dad to be Tibbles (the mean gnome...haha).
We'll see what happens with that. 

One more off that list!
-duvet cover
-child's cupboard re-do
-felt food for kids
-birthday banner
-kids slippers
-boys pirate party
-baby girl romper w/vintage corduroy
-leg warmers
-wall art for family
-hot shirt for momma :)
-hand made rings
-owl bookends
-play mat
-zipper purse
-state love art
-Halloween costumes

Tuesday, October 25, 2011

~damaged goods~

We go to the library weekly.
A few weeks ago I check out this book:
Sewing Bits and Pieces.
It was alright. 
There were a couple cute projects in there I was
going to attempt (owl bookends being one of them).
I had the book sitting on my table, waiting to
copy the patterns onto tracing paper
when I spilled a little tiny bit of coffee.
The coffee got on the very bottom of a few
of the last pages in the book and a little on the back cover.
I let it dry....it's not too bad.
It was obvious that it had MINIMAL damage but
most definitely still usable.
I return it to the library, expecting to be charged
a fine because of this but boy am I shocked 
to see what the fine is......
$21.99!
GIVE ME A BREAK!
Assuming that this was a typo or something,
I go into the library yesterday and ask them about it.
They have the book set aside and bring it out.
I see it EXACTLY as I have returned it.....
MINIMAL WATER DAMAGE in the back.
I explain to her that there is no denying I have
damaged the book but the fine seems outrageous
for what little damage has been done.
She explains to me that the book is unusable now.
(In who's world?)

She says to me, "Would you want to check a book
out that was in this condition?"

My response, "Uh yes....and as a matter of fact, I have 
many times from this very library. I have
actually checked out books that were in far
worse condition than that one."

I asked her if I could dispute or appeal the charge
and she said no. AND....if I don't pay it in 30 days,
I get sent to collections.
The encounter was a friendly one....I had decided
before I went in that I would just have to be
OK with whatever the outcome was. I didn't 
want my day to get ruined over $20.

So-looks like next week I will be going into the 
library, paying a ridiculous fine......
and walking out of there the new pissed proud 
owner of this book.

Moral of the story.....
NEVER spill even a drop of liquid on your library book!
I'll think twice before reading while in the bathtub again too.

Monday, October 24, 2011

~bookends~

Well-it looks like I can cross the bookends off my list.
CAN I GET A WOOT-WOOT!!
They aren't the bookends I originally intended to make.
I decided the owl bookends would be too much work
at this point. Last year after my Mom cleaned out her fabric room 
she gave me a ton of fabric.
I found some vintage strawberry shortcake pillow dolls
 hidden in one of the boxes she gave me.
I remember her making them for me when 
I was a little girl.....they might actually be antique.
(KIDDING! I'm not that old!)
Since I got them I've been brainstorming ideas for them
and I thought this would be perfect.
I love the color combination in them and I think they
will look adorable on my little lady's book case.
I'm actually going to attempt a tutorial for this.
It's my first attempt at a tutorial so go easy on me.
I thought it best to start with a simple one.


1-cut out the pillow shapes and pin right sides together.
Don't forget to leave a space open for your filling/beans.

2-sew the pillow together leaving the opening at the top.
 3-snip all the way around the pillow and trim down the excess fabric.
Turn them ride side out now and iron.
4-Now it's time to fill it. I used large beans for the weight
and filled at least the bottom half with these. I filled in the 
top half with stuffing. I also put a few beans throughout the top
to help give it some shape.
5-pin the top together.
6-hand stitch the opening together.
Make sure this is a secure stitch so the little
ones can't get to the beans.

At this point you are done.
However, I wanted to adorn the doll with a little
something to give it a bit of texture.
I decided on a bow.
I just hand stitched it and attached the button to the center of it.
I attached it with a glue gun but if I were to make another,
I would prefer to actually sew this to the doll so I
didn't have to worry about it getting ripped off as easily.
This would need to be done first thing....before you 
sew the pieces together.
It was super easy and only took about an hour.
I will give this to my little lady for her birthday
with a new bookcase for her room.


-duvet cover
-child's cupboard re-do
-felt food for kids
-birthday banner
-kids slippers
-boys pirate party
-baby girl romper w/vintage corduroy
-leg warmers
-wall art for family
-hot shirt for momma :)
-hand made rings
-owl bookends
-play mat
-zipper purse
-state love art
-Halloween costumes

It feels good to cross that off!


~my list~

Remember my list of birthday and Christmas projects?
Yeah....I didn't think so.
Let me remind you:
-duvet cover
-child's cupboard re-do
-felt food for kids
-birthday banner
-kids slippers
-boys pirate party
-baby girl romper w/vintage corduroy
-leg warmers
-wall art for family
-hot shirt for momma :)
-hand made rings
-owl bookends
I love making lists just so I can cross things off.
I once read that it releases endorphins in your brain
to cross something off a list.
Sometimes when I'm feeling useless I will make
a list of stuff I've already done.....and then cross them off
just to try and make myself feel better.
Not sure if it really works :)
Today I'm going to cross off the book-ends
and hopefully show you. 

I'm making some headway!
Yay....
unfortunately I'm also adding a couple things to the list:
-play mat
-zipper purse
-state love art (you just wait....it's cute!)
-Halloween costumes

I guess I'll be moving the Halloween costumes
to the top of the list.....I'm running out of time for that.

Sunday, October 23, 2011

~birthday banner-Tim Gunn style~

Remember the list of projects I told you about
the other day? I decided to start off with the
easiest project......the birthday banner.
It turned out adorable!
I totally winged it.
I didn't take pics during the process because
I figured it's pretty self explanatory.
Pretty easy and IMPOSSIBLE to screw up.....RIGHT?
WRONG!
The process of getting it to this final result was 
not as easy as it would have been if I'd given
it a little thought before I dived (is this a word?) 
into it. Maybe I should have researched and
read some tutorials about them eh?

Anyway-I cut the triangle flags out with a pattern
I made out of a piece of paper. 
I used fabric scraps I had on hand here.

The letters are from a cardboard birthday banner that
I have been using for years to decorate with.
I cut the letters out and painted over
them with some Martha Stewart acrylic glitter paint.

Next, I sewed the letters onto the flags.

I decided to use a piece of thick, gigantic rick-rack
to sew the flags onto. 
I folded it in half and started with the center flag
and worked my way out, pinning the flags to the rick-rack.

Last step was to sew the flags onto the rick-rack.

I finished it late Thursday night and was
excited to hang it up and show my son Friday morning,
as we had been working on it together and talking about it.
Well-I hang it up and soon realize,
"CRAP! This sucker is huge!"
I forgot to measure the space I would be hanging it in.
I normally would hang it in my bay window above 
my dining room table. Well-I tried that and it 
swooped down to the floor.
(sorry-no pic)
I thought to myself,
"Well-I'll try it on my main living room wall."
This is what it looked like on that:

Not the look I was going for.
B-A-D......BAD!
So....in true Tim Gunn fashion I
was faced with a "make it work" moment.
I didn't want to take the time to unpick
the flags and cut the rick-rack smaller so I decided
instead to do a gathering stitch on the part
of the flags that lay behind the rick-rack.
Like this:
(Wow....this is a really bad picture....sorry.
You get the idea right?)
Notice my stubby fingernails.
Projects such as this make me chew my nails :(
After I adjusted the gathers across the 
entire banner I LOVED the result.
I think it gives it a happier vibe and 
it's different than any I have seen around.

It fits perfectly in the bay window
and I can't wait for our birthdays to roll around
so I can hang it up.
The banner was easily fixed......
my nails on the other hand
will take a couple weeks. 
OUCH!

~let's swap~

Jolie and I have been talking about
swapping for a couple years now.....
....and I'm not talking anything freaky like Sister Wives.
 (which I happen to be obsessed with right now! I love it!)

Let's talk about our closets!
 We are going to be organizing and 
hosting a clothing swap 
SPRING 2012.
So-as you are rotating your wardrobes;
folding those summer clothes with a tear
stained face as you think about
our winter hell wonderland and
bringing those sweaters, boots and leggings
out of moth ball heaven, 
keep this in mind.
Don't throw your stuff away 
or donate it to the D.I. just yet.
Set it aside and bring it to our swap
in the spring. 
If you're anything like me, you have
tons of stuff that is in decent condition and
you absolutely love it but for one reason
or another, you don't wear it. 
Bring it to the swap and swap it for 
someone else's hidden fashion treasure.
All sizes of clothes
purses
jewelry/accessories
footwear

We are going to spend the winter 
researching this and planning the 
best way to have a successful clothing
swap so stay tuned for more
information and guidelines.
In these crappy economic times
what better way to spruce up
your wardrobe and put a skip
in your step after a long, cold winter? 

Alone, we can't have Carrie Bradshaw's closet
but together....we can come damn close!
(If you don't know who Carrie Bradshaw is.....you
haven't seen Sex and the City.)

Sunday, October 16, 2011

~summer eats and Christmas projects~

Am I the only one who can't believe summer
is already over? It flew by this year.
I'm not complaining,
I love the fall.
It's my favorite season.
I love the crispness of the air,
the smell of cold weather,
the colors of the season
and the anticipation of
the holiday season and a new year.

Unfortunately, with fall comes a farewell to 
fresh garden tomatoes.
Tomatoes are quite possibly my favorite part of summer :)
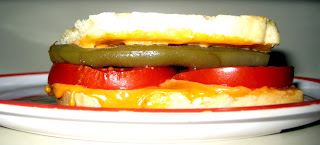
One of my favorite ways to devour them:
 Tomato and dilly bean sandwich on toasted sourdough bread
with melted velveeta cheese.
You know, the kind of cheese that isn't real cheese.
You either love that cheese or you hate it.
I've never met an in-betweener on this subject.
I'm a bonified lover of this.
My hubs calls veleveeta "ass cheese".....
(definition: cheese you can throw against 
the wall and it sticks there all by itself)

Anyway, I haven't worked on any projects
for a couple months. My sewing/crafting table is
buried with projects that need to be completed.
I need to get on it....
birthdays and holidays are coming up
and I have soooo much to get done.
I actually have a lot I can post on here
that I've already completed and not posted about:
-kitchen curtains/shelf
-boys bedspread
-bath toy bag
-family map art
-girls wall art
-tween girls circle skirts
See-I wasn't lying....I just need to
take the pics and get around to telling you
about them. 

Projects I have in the works that you'll
hopefully see on here between now and Christmas:
-duvet cover
-child's cupboard re-do
-felt food for kids
-birthday banner
-kids slippers
-boys pirate party
-baby girl romper w/vintage corduroy
-leg warmers
-wall art for family
-hot shirt for momma :)
-hand made rings
-owl bookends
WOW....when I see it written down it looks
like I may have bit off more than I can chew.
Speaking of chewing...
Aren't these cheeks just delicious?
I've been eating them all summer too.

What are your Christmas projects?

Total Pageviews